Adding Pi-Hole to Network
Being an expat basically means you need to also be a Network Engineer. Between needing to access home country banks, keeping the kids happy with streaming services, and making sure that you are able to have quality video chats with family back home, your home internet connection and network play an important role in your domestic happiness.
Current Network Setup
Below provides an outline of current network setup:
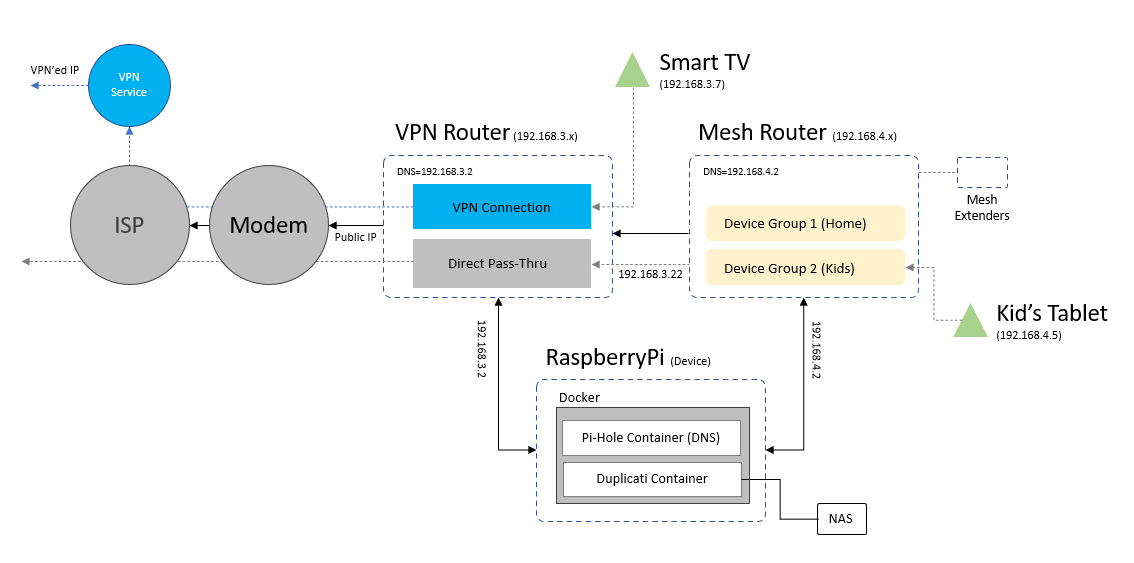
VPN Router
Exit point to ISP is an ExpressVPN imaged Router. This gives me the option to specify devices as either VPN or non-VPN.
Mesh Router
Provides coverage for most of the house and is not routed via VPN so represents typical local geographic network. Currently this is managed via Nokia Beacon 1 mesh routers which additionally allow me to create “Family Profiles” where I can specify groups for devices. This allows me to create a “Kids” group that has specific allowed times (e.g. it prevents kids from using wifi on their devices after bedtime, etc.).
RaspberryPi
I have a RaspberryPi attached to network for backup management purposes as previously summarized here. Since this was upgraded to operate via Portainer (Docker management UI) we can now add additional services to the Pi.
Adding Pi-Hole
Pi-Hole is a popular DNS service that can be installed on RaspberryPis. It provides DNS reporting, but also filters DNS requests to prevent malware and reduce network load from ads. This is supposed to result in some increase in network speed as well as potential improvement in privacy and security.
My main motivation for adding Pi-Hole was two-fold:
- Curiousity to explore
- Improve ability to track what network devices are doing in one central location
In particular for #2 as we are getting older children in the house I wanted some means by which to occasionlly audit (and possibly filter) traffic if needed.
Container Installation
Installation was pretty straight forward due to Docker container. Comprehensive instructions can be found here.
Attaching to both Routers for improved Tracking
I ended up having to connect the Pi to both the VPN Router and the Mesh Router so that client information could be recorded. If you only have the Pi attached to the VPNRouter then all DNS resolution requests come “through” the Mesh Router so reports don’t show which device on the Mesh Router is generating the traffic. To provide client IP tracking at both the VPN and Mesh Router level the Pi is attached to both and the Primary DNS is set to the local DNS IP. This way client devices can directly query DNS and reporting is captured at the client device level.
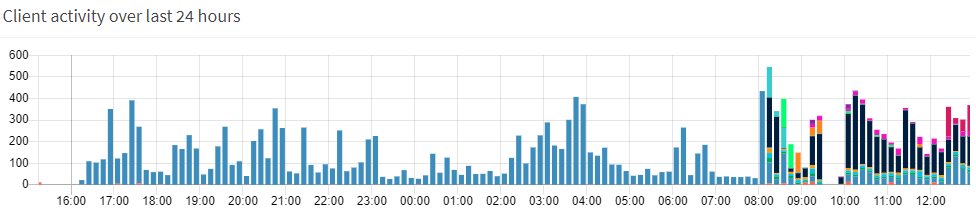
You can see here the difference in reporting. The period of time with one color (blue) was where DNS query was routed from Mesh Router to Pi attached to VPN Router, thus all queries were attributed to the Mesh Router IP. After connecting to both routers and reconfiguring the queries are now split by client IP:
Results
The installation and setup was pretty easy and the Pi-Hole immediately started capturing DNS requests:
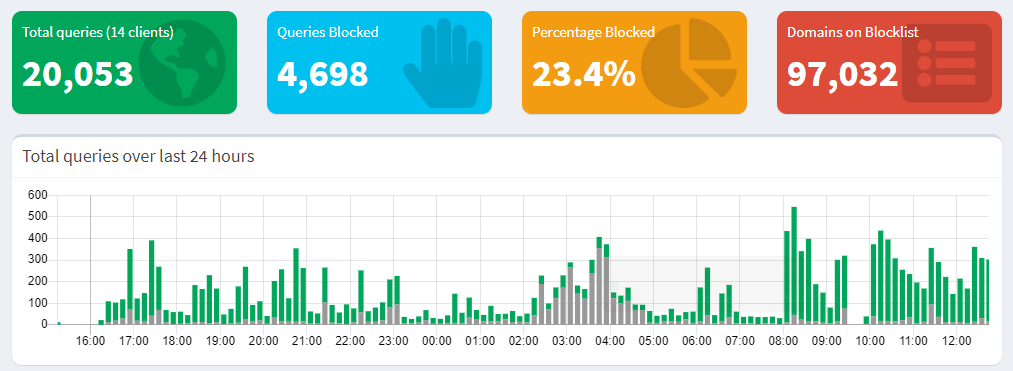
Currently roughly 23% of the traffic is being “rejected” due to being blacklisted with most of them being recognizable ad networks:
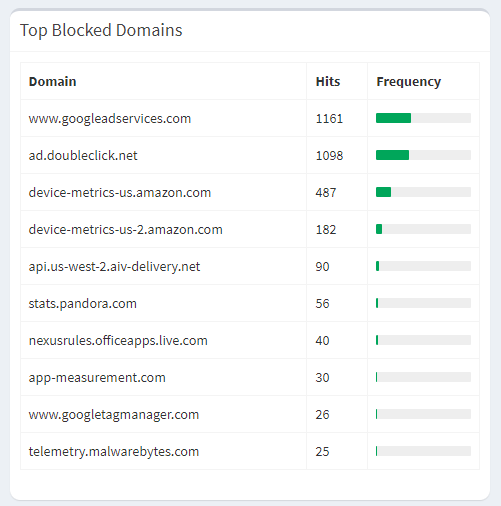
Initially the data was pretty skewed due to very “noisy” Amazon devices that send telemetry back to Amazon. If you want to disable this Device Usage Data Collection you can find instructions here.